
Quick Recipe Version (TL;DR)
Quick Ingredients
- 2 lb (900 g) fresh pork ears
- 10 cups water, divided
- 3 tbsp kosher salt, divided
- 3 tbsp rice vinegar or white vinegar, divided
- 1 small onion, 8 garlic cloves, 1-inch ginger
- 4 bay leaves, 2 tsp black peppercorns
- 1 1/2 cups rice or white vinegar (5% acidity)
- 1 1/2 cups water
- 1/3 cup soy sauce
- 1/4 cup granulated sugar
- 1 tsp coriander seeds, 1 tsp mustard seeds (optional)
- 2 dried red chilies or 1 tsp chili flakes
- 1 small carrot, 2 scallions, fresh cilantro (for serving)
Do This
- 1. Rinse pork ears well, scraping off any visible debris or stray hairs.
- 2. Blanch in boiling water with 1 tbsp salt and 1 tbsp vinegar for 5 minutes; drain and rinse.
- 3. Simmer ears in fresh water with onion, garlic, ginger, bay leaves, peppercorns, and salt for 1 1/2–2 hours until tender but springy. Cool, then chill.
- 4. Meanwhile, boil together vinegar, water, soy sauce, sugar, salt, spices, garlic, and chilies for 2 minutes; cool completely.
- 5. Slice chilled ears into very thin strips (about 1/8 inch), then pack into a glass jar with carrot sticks.
- 6. Pour cooled brine over to fully submerge, add scallion whites if desired, then cover and refrigerate at least 24 hours.
- 7. To serve, drain, pile on a small platter, garnish with scallion greens and cilantro, and enjoy cold as a crunchy charcuterie bite.
Why You’ll Love This Recipe
- Delivers that nostalgic, old-school charcuterie vibe with a crunchy, bouncy texture you cannot get from sliced ham.
- Bright, tangy vinegar brine balanced with a touch of sweetness and gentle heat from dried chilies.
- Mostly hands-off: simmer, marinate overnight, then slice and serve for an impressive make-ahead appetizer.
- A thrifty nose-to-tail recipe that turns an inexpensive cut into something special and conversation-worthy.
Grocery List
- Produce: 1 small onion, garlic, 1-inch piece fresh ginger, 1 small carrot, 2 scallions, fresh cilantro (optional garnish).
- Dairy: None.
- Pantry: Fresh pork ears (from the butcher), rice vinegar or white vinegar, soy sauce, granulated sugar, kosher salt, whole black peppercorns, bay leaves, coriander seeds, mustard seeds (optional), dried red chilies or chili flakes.
Full Ingredients
Pork Ears and Simmering Broth
- 2 lb (900 g) fresh pork ears, cleaned
- 10 cups water, divided
- 3 tbsp kosher salt, divided
- 3 tbsp rice vinegar or white vinegar (5% acidity), divided
- 1 small yellow onion, peeled and quartered
- 8 garlic cloves, peeled and lightly smashed (divided use; 4 for simmering, 4 for brine)
- 1 piece fresh ginger, about 1 inch, sliced
- 2 bay leaves
- 1 tsp whole black peppercorns
Pickling Brine
- 1 1/2 cups rice vinegar or white vinegar (5% acidity)
- 1 1/2 cups water
- 1/3 cup soy sauce (regular, not low-sodium, for best flavor)
- 1/4 cup granulated sugar
- 2 tsp kosher salt
- 4 garlic cloves, thinly sliced
- 1 small shallot, thinly sliced (optional, for extra aroma)
- 2 bay leaves
- 1 tsp whole black peppercorns
- 1 tsp whole coriander seeds
- 1 tsp mustard seeds (optional, for a more European-style pickle note)
- 2 dried red chilies, broken, or 1 tsp red chili flakes (adjust to taste)
- 1 small carrot, peeled and cut into thin matchsticks
- 2 scallions, white and green parts separated and thinly sliced
For Serving (Optional but Recommended)
- Fresh cilantro leaves
- Extra chili oil or toasted sesame oil, for drizzling
- Crusty bread or crackers, for a charcuterie-style board
Step-by-Step Instructions
Step 1: Clean and Prep the Pork Ears
Rinse the pork ears thoroughly under cold running water. Use your fingers to rub away any visible debris. If you see any stray hairs, carefully singe them over a gas flame or scrape them off with the back of a knife or a disposable razor. Trim off any ragged edges, excess fat, or discolored spots.
For a cleaner flavor, you can soak the ears in a large bowl of cold water for 30 minutes, changing the water once. This helps draw out blood and impurities. Drain well before blanching.
Step 2: Blanch to Remove Impurities
In a large pot, bring 6 cups of water to a rolling boil. Add 1 tbsp kosher salt and 1 tbsp vinegar. Carefully slide in the pork ears. Return to a boil, then reduce the heat slightly and simmer for 5 minutes. Skim off any foam or scum that rises to the surface.
After 5 minutes, turn off the heat. Use tongs to transfer the ears to a colander, and discard the blanching water. Rinse the ears under warm running water to remove any remaining foam. Rinse out the pot as well so you start the simmering step with a clean base.
Step 3: Gently Simmer Until Tender but Bouncy
Return the cleaned pot to the stove. Add the blanched pork ears, 4 cups of fresh water (or enough to cover by about 1 inch), 2 tbsp kosher salt, 2 tbsp vinegar, the quartered onion, 4 smashed garlic cloves, sliced ginger, 2 bay leaves, and 1 tsp black peppercorns.
Bring to a boil over medium-high heat, then reduce to a low simmer. Cover partially with a lid, leaving a small gap for steam to escape. Simmer gently for 1 1/2 to 2 hours, until the ears are tender but still springy when pressed. They should not be falling apart; you want a pleasant chew with some snap from the cartilage.
Start checking at 1 1/2 hours. Pierce the thickest part with a fork; it should slide in without much resistance. When done, turn off the heat and let the ears cool in the broth for about 30 minutes. This helps them stay moist and flavorful.
Step 4: Chill the Ears for Easy Slicing
Once the ears are warm rather than hot, transfer them to a shallow dish or container. Discard the simmering aromatics (onion, ginger, bay leaves, etc.) and broth, or strain and save the broth for soups if you like its flavor.
Spread the ears out in a single layer if possible so they cool faster. Cover and refrigerate for at least 1 hour, or until fully chilled. Chilled pork ears will firm up, making it much easier to slice them thinly and evenly later on.
Step 5: Make the Tangy Spiced Vinegar Brine
While the ears are chilling, prepare the brine. In a medium saucepan, combine the vinegar, water, soy sauce, sugar, and 2 tsp kosher salt. Add the sliced garlic, sliced shallot (if using), 2 bay leaves, black peppercorns, coriander seeds, mustard seeds (if using), and dried chilies or chili flakes.
Bring the mixture to a boil over medium-high heat, stirring to dissolve the sugar and salt. Once it reaches a boil, reduce to a gentle simmer and cook for 2 minutes to bloom the spices and mellow the raw garlic flavor. Turn off the heat and let the brine cool to room temperature. This is important: if the brine is too hot when poured over the ears, it can overcook them and dull their texture.
Step 6: Thinly Slice the Ears
Remove the chilled pork ears from the refrigerator. Pat them dry with paper towels. Place one ear flat on a cutting board with the smooth skin side facing down for stability.
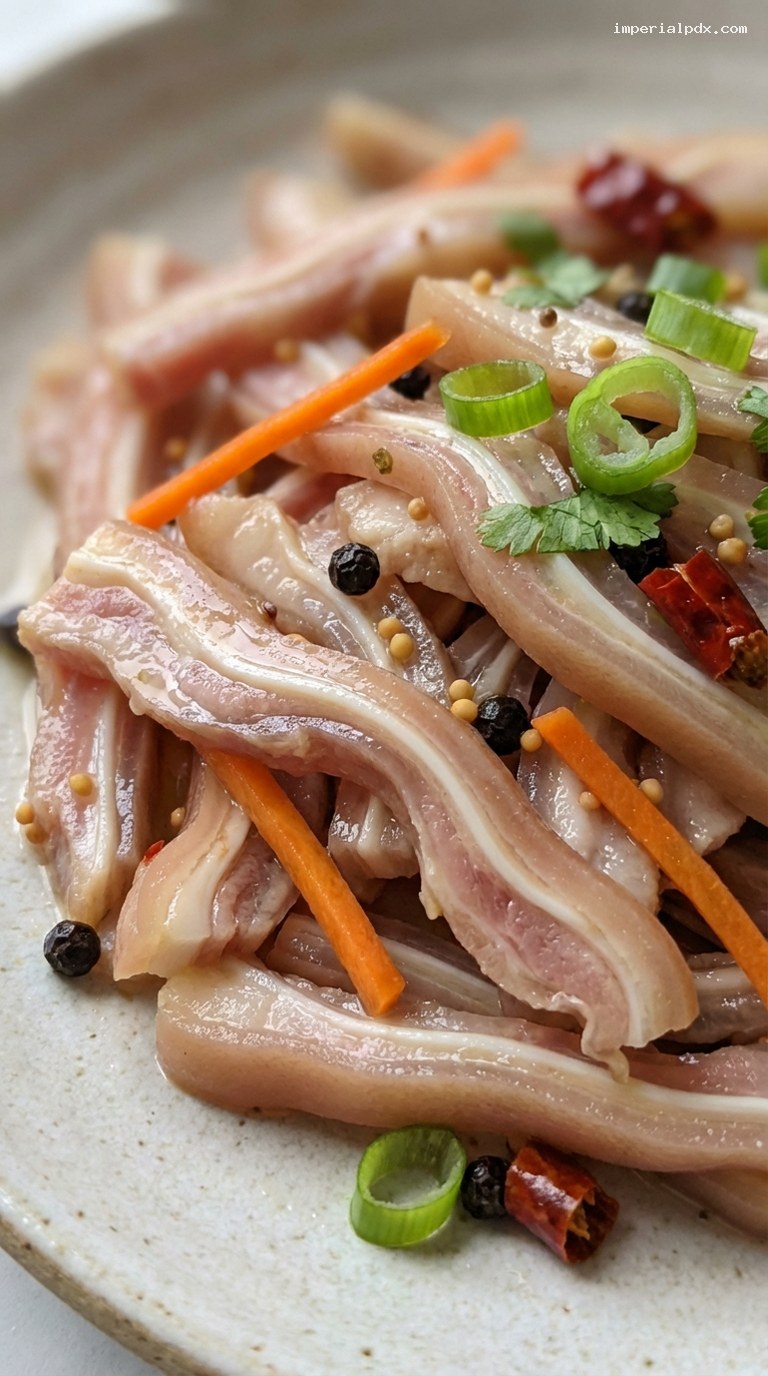
Using a sharp chef’s knife, slice crosswise into very thin strips, about 1/8 inch thick. You should see concentric rings of skin, fat, and cartilage in each slice. The thinner you slice, the more pleasantly crunchy and easy to eat they will be once pickled. Repeat with the remaining ears.
Step 7: Pack and Marinate in the Brine
Place the sliced ears into a clean glass jar or nonreactive container (glass or ceramic is ideal). Add the carrot matchsticks and the sliced white and light green parts of the scallions. Toss lightly to distribute.
Pour the completely cooled brine (including all the spices and garlic) over the ears and vegetables. Make sure everything is fully submerged; use a small, clean weight (like a smaller jar or a piece of parchment topped with a ramekin) if needed to keep the slices under the liquid.
Cover tightly and refrigerate for at least 24 hours before serving. For deeper flavor, 36–48 hours is even better. During this time, the vinegar, soy, and spices will soak in, and the ears will become bright, tangy, and nicely seasoned all the way through.
Step 8: Serve as a Crunchy Old-School Charcuterie Bite
When ready to serve, use a slotted spoon or tongs to lift the pickled pork ear strips and carrots from the brine, letting excess liquid drip off. Arrange them in a generous pile on a chilled plate or small serving platter. Spoon a few peppercorns and chili pieces over the top for visual interest.
Garnish with the sliced green parts of the scallions and a few fresh cilantro leaves. If you like a richer edge, drizzle lightly with chili oil or toasted sesame oil. Serve cold as part of a charcuterie board with crusty bread or crackers, or enjoy on their own with a cold beer. The texture should be pleasantly crunchy and bouncy, with a bright, puckery finish.
Pro Tips
- Do not skip the blanch. That quick first boil in salted, vinegared water is key for removing impurities and any strong porky aroma, giving a clean-tasting final pickle.
- Slice as thinly as you comfortably can. Very thin, even slices make the ears tender to bite yet still crunchy. A sharp knife and thoroughly chilled ears make this easy.
- Let the brine cool completely. Hot brine can toughen the texture and may create cloudy pickling liquid. Room-temperature brine gives a crisp, clear finish.
- Adjust the heat to your liking. Use more or fewer dried chilies to control spiciness. For a very mild version, omit them entirely; for more kick, add chili flakes when serving.
- Plan ahead for best flavor. The sweet spot is usually 24–48 hours of marinating. After that, the flavor deepens further but the tang becomes more assertive.
Variations
- Sichuan-style spice. Add 1–2 tsp toasted Sichuan peppercorns and 1 star anise to the brine. When serving, drizzle with chili oil and sprinkle with extra scallions and cilantro.
- More European charcuterie vibe. Increase the mustard seeds to 2 tsp, add 4–5 allspice berries, and finish the platter with chopped fresh parsley and a side of grainy mustard.
- Extra-garlicky bar snack. Double the sliced garlic in the brine and add a finely sliced fresh red chili. Serve the ears in small bowls with toothpicks for a simple, punchy nibble.
Storage & Make-Ahead
These pickled pork ears are ideal for making ahead. Once packed in the cooled brine, they should be kept refrigerated at all times and stored fully submerged in the liquid. For best texture and flavor, enjoy within 3–5 days, though they can be kept up to 7 days if handled with clean utensils and kept cold.
Do not freeze; freezing will damage the texture and make the ears mushy once thawed. If you are preparing for a party, you can simmer the ears up to 2 days in advance, chill, and keep them whole. Then slice and pickle them 1–2 days before serving so they are at peak crunch and brightness.
Nutrition (per serving)
Approximate values per serving (about 3–4 oz pickled pork ears plus a little brine and vegetables): 220 calories; 16 g protein; 15 g fat; 4 g carbohydrates; 1 g fiber; 4 g sugar; 750 mg sodium. These values are estimates and will vary based on the exact size of the ears, how much surface fat is trimmed, and how much brine is consumed.