Quick Recipe Version (TL;DR)
Quick Ingredients
- 1 1/2 pounds boneless, skinless chicken thighs, trimmed
- 1 1/2 cups dill pickle brine, plus 2 tablespoons for the dredge
- 1 1/2 cups buttermilk, divided
- 1 large egg
- 1 tablespoon hot sauce
- 1 1/2 cups all-purpose flour
- 1/2 cup cornstarch
- 2 teaspoons baking powder
- 2 teaspoons smoked paprika
- 1 1/2 teaspoons garlic powder
- 1 teaspoon onion powder
- 1 teaspoon black pepper
- 1 teaspoon kosher salt
- 1/2 teaspoon dried dill
- 1/4 teaspoon cayenne pepper
- 4 cups neutral oil, for frying
- Dill pickle chips and fresh dill, for serving
Do This
- 1. Marinate chicken in 1 1/2 cups pickle brine, 1/2 cup buttermilk, and hot sauce for exactly 2 hours in the refrigerator.
- 2. Whisk flour, cornstarch, baking powder, smoked paprika, garlic powder, onion powder, black pepper, salt, dried dill, and cayenne in a shallow dish.
- 3. In a second dish, whisk 1 cup buttermilk, 1 egg, and 2 tablespoons pickle brine.
- 4. Drain chicken, pat lightly dry, dredge in flour, dip in buttermilk mixture, then dredge again in flour. Rest 15 minutes.
- 5. Heat 4 cups oil in a Dutch oven or heavy skillet to 350°F.
- 6. Fry chicken in batches for 4 to 5 minutes per side, until deep golden and 165°F inside.
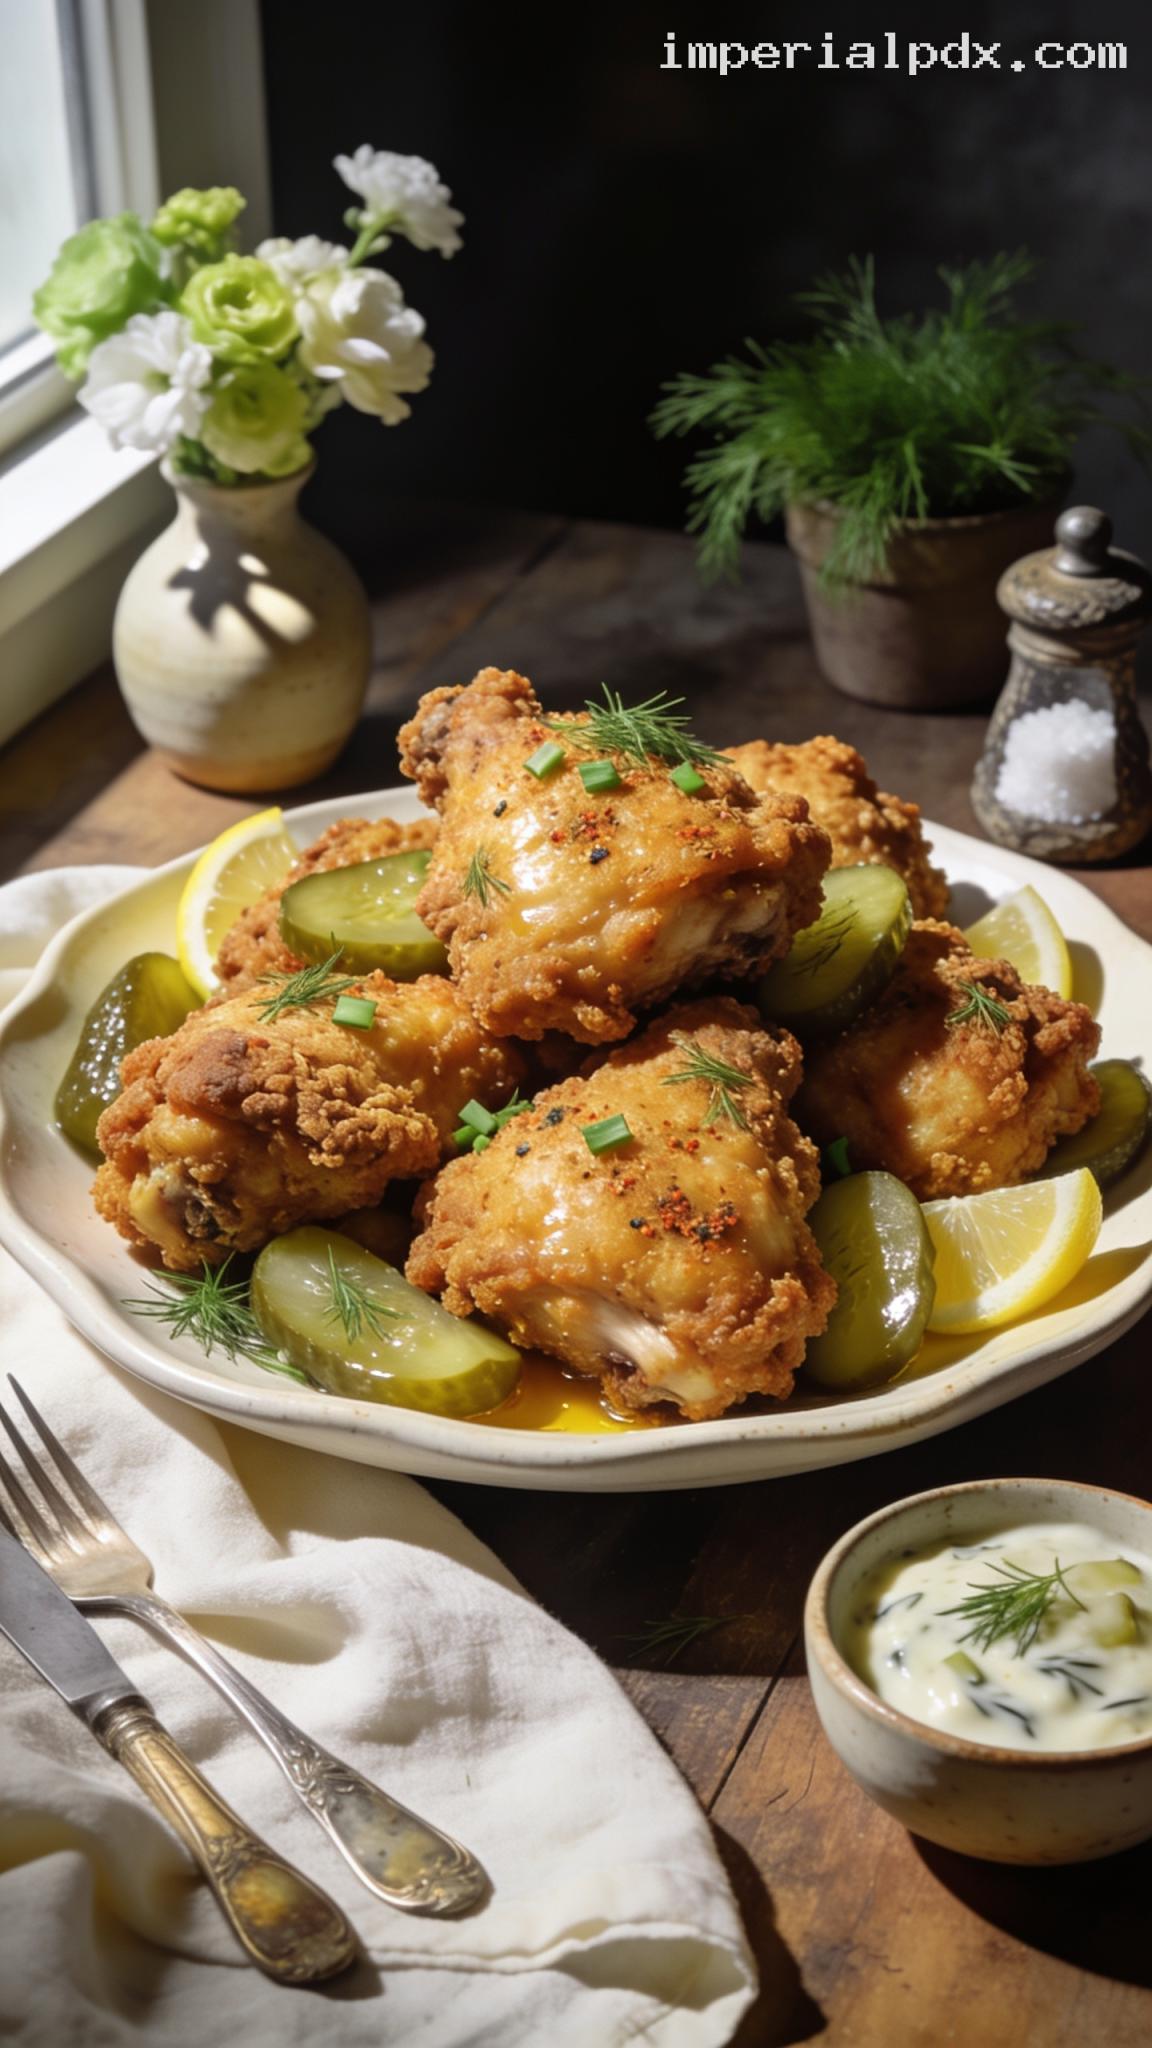
- 7. Drain on a wire rack, sprinkle lightly with salt if desired, and serve hot with pickle chips and fresh dill.
Why You’ll Love This Recipe
- Big pickle flavor without being overpowering: The brine seasons the chicken all the way through, giving it a tangy, salty, zippy edge.
- Extra juicy chicken: Buttermilk and pickle brine help keep the chicken tender while it fries.
- Crispy, craggy coating: Cornstarch, baking powder, and a double dredge create a crunchy crust that clings beautifully.
- Home-cook friendly: Boneless chicken thighs cook quickly, stay moist, and are forgiving in the fryer.
Grocery List
- Produce: Fresh dill, optional lemon wedges
- Dairy: Buttermilk, egg
- Meat: Boneless, skinless chicken thighs
- Pantry: Dill pickle brine, dill pickle chips, all-purpose flour, cornstarch, baking powder, smoked paprika, garlic powder, onion powder, black pepper, kosher salt, dried dill, cayenne pepper, hot sauce, neutral frying oil
Full Ingredients
For the Pickle-Brined Chicken
- 1 1/2 pounds boneless, skinless chicken thighs, trimmed of large excess fat
- 1 1/2 cups dill pickle brine from a jar of dill pickles
- 1/2 cup buttermilk
- 1 tablespoon hot sauce
For the Crispy Dredge
- 1 1/2 cups all-purpose flour
- 1/2 cup cornstarch
- 2 teaspoons baking powder
- 2 teaspoons smoked paprika
- 1 1/2 teaspoons garlic powder
- 1 teaspoon onion powder
- 1 teaspoon freshly ground black pepper
- 1 teaspoon kosher salt
- 1/2 teaspoon dried dill
- 1/4 teaspoon cayenne pepper
For the Buttermilk Dip
- 1 cup buttermilk
- 1 large egg
- 2 tablespoons dill pickle brine
For Frying and Serving
- 4 cups neutral oil, such as canola, vegetable, or peanut oil, or enough to fill a heavy pot with 1 1/2 inches of oil
- 1/4 teaspoon kosher salt, for finishing, optional
- 1/2 cup dill pickle chips, for serving
- 2 tablespoons chopped fresh dill, for garnish
- Lemon wedges, optional
Optional Pickle-Dill Sauce
- 1/2 cup mayonnaise
- 2 tablespoons sour cream
- 2 tablespoons finely chopped dill pickles
- 1 tablespoon dill pickle brine
- 1 tablespoon chopped fresh dill
- 1 teaspoon Dijon mustard
- 1/4 teaspoon garlic powder
- 1/8 teaspoon black pepper
Step-by-Step Instructions
Step 1: Marinate the chicken in pickle brine
Place the chicken thighs in a large zip-top bag or shallow nonreactive dish. Add 1 1/2 cups dill pickle brine, 1/2 cup buttermilk, and 1 tablespoon hot sauce. Turn the chicken to coat every piece, then seal or cover and refrigerate for exactly 2 hours.
This marinating time gives the chicken a tangy, salty flavor while keeping the texture tender. Try not to marinate much longer than 4 hours, especially with boneless chicken, because the pickle brine can make the surface too salty and slightly firm.
Step 2: Mix the crispy flour coating
In a wide, shallow dish, whisk together 1 1/2 cups all-purpose flour, 1/2 cup cornstarch, 2 teaspoons baking powder, 2 teaspoons smoked paprika, 1 1/2 teaspoons garlic powder, 1 teaspoon onion powder, 1 teaspoon black pepper, 1 teaspoon kosher salt, 1/2 teaspoon dried dill, and 1/4 teaspoon cayenne pepper.
For extra crunchy little bits, drizzle 2 tablespoons of the buttermilk dip from Step 3 into the flour mixture after you make it, then rub the flour between your fingers until small clumps form. These clumps fry into the craggy, crisp edges that make fried chicken so satisfying.
Step 3: Prepare the buttermilk dip
In a second shallow dish, whisk 1 cup buttermilk, 1 large egg, and 2 tablespoons dill pickle brine until smooth. The egg helps the coating set, while the buttermilk gives the crust a little tang and helps the flour cling to the chicken.
Step 4: Dredge and rest the chicken
Remove the chicken from the marinade and let the excess drip off. Pat the chicken lightly with paper towels; it should be damp but not dripping. Working one piece at a time, coat the chicken in the flour mixture, pressing firmly so the flour sticks. Dip it into the buttermilk mixture, let the excess drip off, then return it to the flour mixture and press again to build a thick, textured coating.
Transfer the dredged chicken to a wire rack set over a baking sheet. Let it rest at room temperature for 15 minutes while the oil heats. This short rest hydrates the flour and helps the crust stay attached during frying.
Step 5: Heat the oil to the right temperature
Pour 4 cups neutral oil into a Dutch oven, deep cast-iron skillet, or heavy-bottomed pot. The oil should be about 1 1/2 inches deep and should not come more than halfway up the sides of the pot. Heat over medium-high heat until the oil reaches 350°F on a deep-fry or instant-read thermometer.
Set a clean wire rack over a baking sheet near the stove for draining the fried chicken. Avoid draining fried chicken directly on paper towels if you can; a rack keeps air flowing around the crust so it stays crisp.
Step 6: Fry until deeply golden and crisp
Carefully lower 2 to 3 pieces of chicken into the hot oil, depending on the size of your pot. Do not crowd the pan. Fry for 4 to 5 minutes on the first side, then flip and fry for another 4 to 5 minutes on the second side, adjusting the heat as needed to keep the oil between 325°F and 350°F.
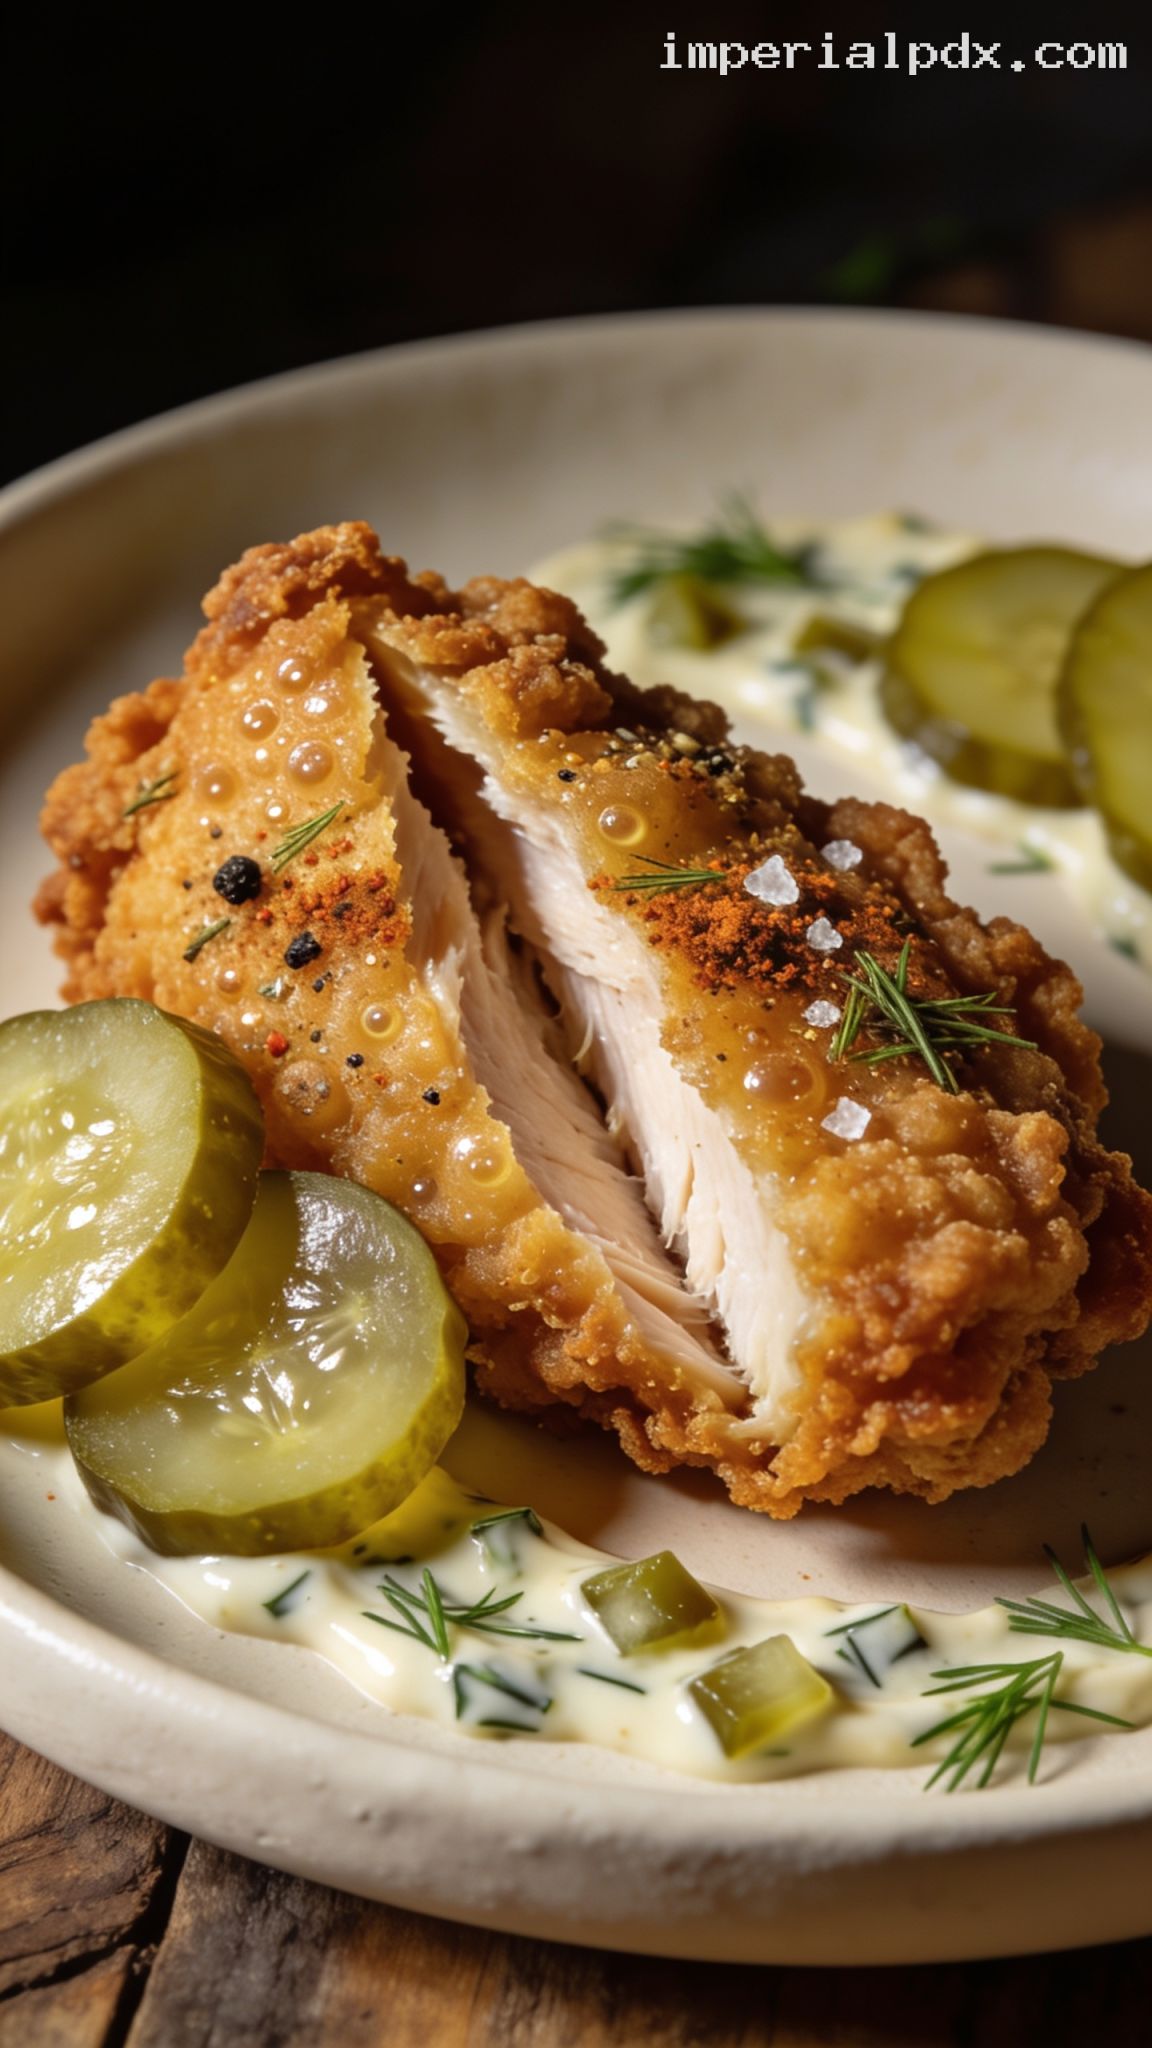
The chicken is done when the crust is deep golden brown and the thickest part of each piece registers 165°F on an instant-read thermometer. Transfer the cooked chicken to the wire rack and repeat with the remaining pieces, allowing the oil to return to 350°F between batches.
Step 7: Finish and serve
While the chicken is hot, sprinkle it very lightly with 1/4 teaspoon kosher salt if desired. Because the pickle brine already seasons the chicken, taste a small edge of crust first if you are unsure. Let the chicken rest for 5 minutes so the juices settle and the crust firms up.
Serve hot with dill pickle chips, chopped fresh dill, and lemon wedges if you like. For a creamy dip, stir together the optional pickle-dill sauce ingredients and serve alongside the chicken.
Pro Tips
- Use dill pickle brine, not sweet pickle brine: Dill brine gives the best tangy, savory flavor for fried chicken.
- Watch the oil temperature: If the oil drops below 325°F, the coating can absorb too much oil. If it rises above 365°F, the crust may brown before the chicken cooks through.
- Press the dredge onto the chicken: Firmly packing the flour mixture onto each piece creates a thicker, crunchier crust.
- Use a thermometer for doneness: Boneless thighs should reach 165°F in the thickest part. This keeps the chicken safe without overcooking it.
- Keep fried pieces crisp: If frying in several batches, place cooked chicken on a wire rack in a 200°F oven for up to 20 minutes while you finish the rest.
Variations
- Spicy pickle fried chicken: Add 1 teaspoon cayenne pepper to the flour mixture and 2 tablespoons hot sauce to the buttermilk dip.
- Pickle-brined chicken sandwiches: Fry the chicken as directed, then serve on toasted brioche buns with shredded lettuce, pickle chips, and pickle-dill sauce.
- Air fryer style: Use the same marinade and dredge, spray the coated chicken generously with oil, and air fry at 380°F for 16 to 20 minutes, flipping halfway through, until 165°F inside. The crust will be lighter than deep-fried chicken but still flavorful.
Storage & Make-Ahead
Fried chicken is crispiest the day it is made, but leftovers keep well in an airtight container in the refrigerator for up to 3 days. Reheat on a wire rack set over a baking sheet in a 375°F oven for 12 to 15 minutes, or until hot and crisp. Avoid microwaving if possible because it softens the crust.
To make ahead, marinate the chicken for exactly 2 hours, then drain and refrigerate it in a covered container for up to 8 additional hours before dredging and frying. You can also whisk the flour mixture up to 1 week ahead and store it in an airtight container at room temperature.
Nutrition (per serving)
Calories: 620 kcal | Carbs: 42g | Protein: 35g | Fat: 34g | Saturated Fat: 7g | Fiber: 2g | Sugar: 3g | Sodium: 1420mg | Cholesterol: 175mg