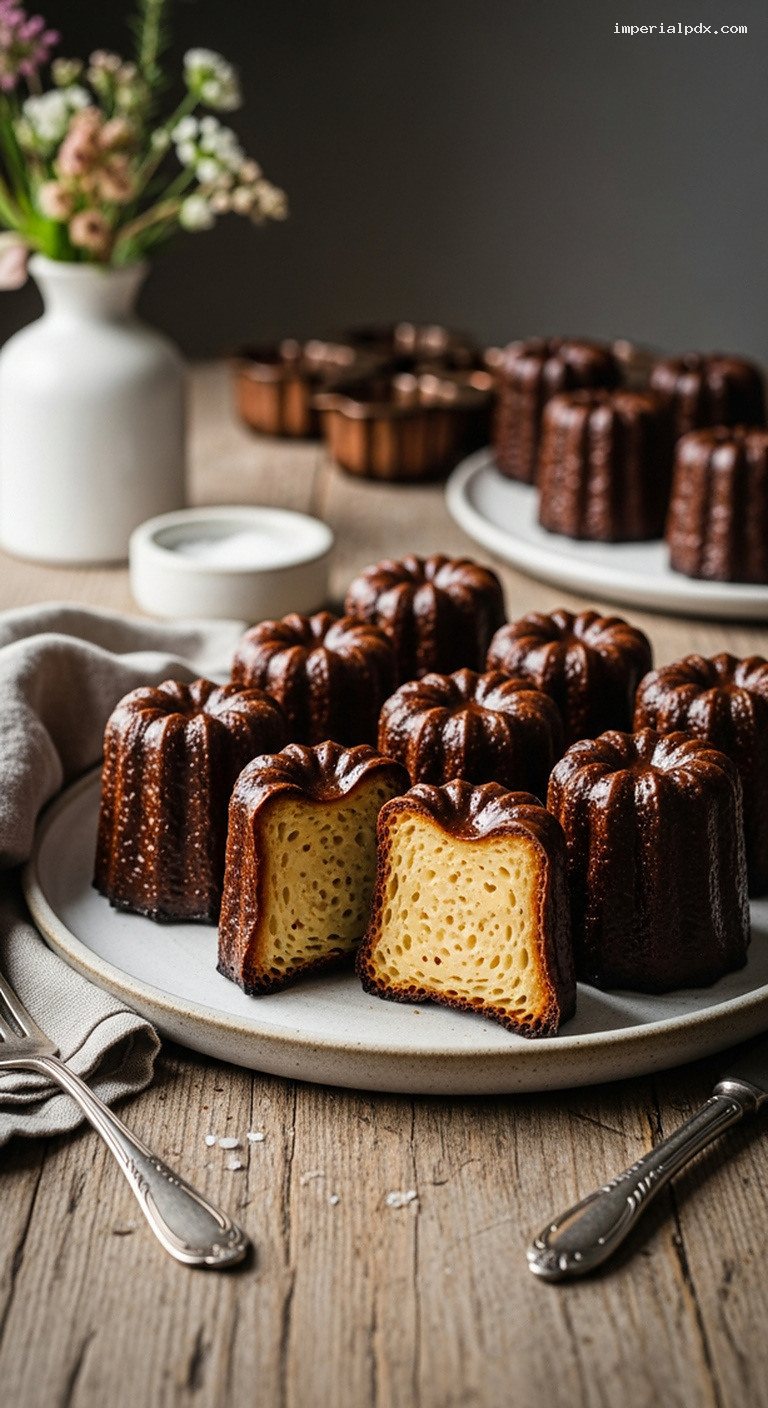
Quick Recipe Version (TL;DR)
Quick Ingredients
- 2 cups (480 ml) whole milk
- 3 tbsp (45 g) unsalted butter (for batter)
- 1 vanilla bean or 2 tsp pure vanilla extract
- 3/4 cup (95 g) all-purpose flour
- 1 cup (200 g) granulated sugar
- 1/4 tsp fine sea salt
- 2 large eggs + 2 large egg yolks
- 1/4 cup (60 ml) dark rum
- Optional: 1 tbsp (15 g) honey
- 1/4 cup (50 g) food-grade beeswax
- 1/4 cup (55 g) unsalted butter (for molds)
Do This
- 1. Heat milk with butter and split vanilla bean (or extract) until steaming, then cool until just warm.
- 2. Whisk flour, sugar, and salt. Lightly whisk eggs and yolks separately. Pour eggs into dry mix, then gradually whisk in warm milk to form a thin batter. Add rum (and honey if using). Strain.
- 3. Cover and refrigerate batter for at least 24 hours (up to 48 hours) for best texture.
- 4. About 45 minutes before baking, place copper molds on a baking sheet in the oven and preheat to 475°F (245°C).
- 5. Melt beeswax and butter together. Carefully brush or swirl into hot molds, pour out excess, and let the coating firm up.
- 6. Fill coated molds almost to the top (about 1/8 inch below rim). Bake 15 minutes at 475°F (245°C), then reduce to 400°F (200°C) and bake 55–60 minutes until very dark mahogany brown.
- 7. Cool 10 minutes, then unmold while still warm. Serve slightly warm or at room temperature the same day.
Why You’ll Love This Recipe
- Classic, deeply caramelized crust with a soft, custardy center, just like in Bordeaux.
- Overnight-rested batter for superior flavor, texture, and those signature tiny bubbles.
- Step-by-step guidance tailored to home ovens and traditional copper molds.
- Includes beeswax-butter mold coating for that authentic crisp, glossy shell.
Grocery List
- Produce: 1 vanilla bean (or use vanilla extract from your pantry)
- Dairy: Whole milk, unsalted butter
- Pantry: All-purpose flour, granulated sugar, fine sea salt, eggs, dark rum, honey (optional), food-grade beeswax
Full Ingredients
For the Canelé Batter
- 2 cups (480 ml) whole milk
- 3 tbsp (45 g) unsalted butter
- 1 vanilla bean, split and seeds scraped
- or 2 tsp pure vanilla extract (added off heat)
- 3/4 cup (95 g) all-purpose flour
- 1 cup (200 g) granulated sugar
- 1/4 tsp fine sea salt
- 2 large eggs, at room temperature
- 2 large egg yolks, at room temperature
- 1/4 cup (60 ml) dark rum (preferably amber or aged)
- Optional but recommended for color and aroma: 1 tbsp (15 g) honey
For Preparing the Copper Molds
- 12 traditional copper canelé molds (about 2 inches / 5 cm high)
- 1/4 cup (50 g) food-grade beeswax, chopped or grated
- 1/4 cup (55 g) unsalted butter
Equipment
- Medium saucepan
- Mixing bowls
- Whisk
- Fine-mesh strainer
- Heatproof jug or pitcher (for easy pouring)
- 12 copper canelé molds
- Large baking sheet
- Cooling rack
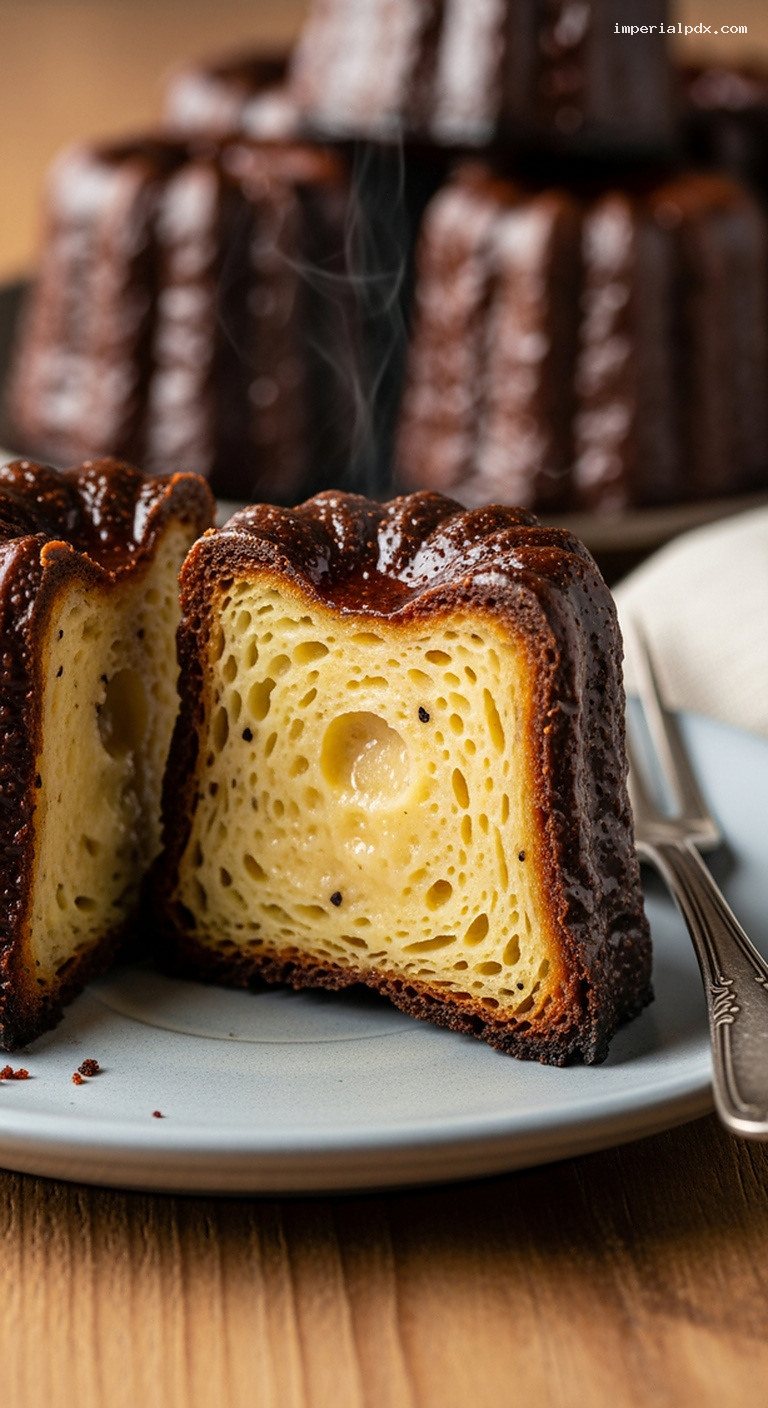
Step-by-Step Instructions
Step 1: Warm the Milk with Vanilla and Butter
In a medium saucepan, combine the whole milk, 3 tbsp (45 g) unsalted butter, and the split vanilla bean with scraped seeds. Place over medium heat and warm, stirring occasionally, until the butter has melted and the milk is steaming and just starting to show small bubbles around the edges. Do not let it boil vigorously.
Once steaming, remove the pan from the heat. If you are using vanilla extract instead of a vanilla bean, wait 5 minutes, then stir in the extract. Allow the milk mixture to cool until it is warm to the touch but not hot (about 110°F / 43°C or cooler). This helps avoid scrambling the eggs later.
Step 2: Mix the Dry Ingredients and Eggs
In a mixing bowl, whisk together the flour, granulated sugar, and salt until well combined and free of lumps.
In a separate small bowl, lightly whisk the 2 whole eggs and 2 egg yolks just until the yolks and whites are blended. You do not want to incorporate a lot of air; whisk gently rather than vigorously.
Step 3: Combine into a Smooth, Thin Batter
Make a well in the center of the dry ingredients. Pour in the beaten eggs and yolks. Using a whisk or spatula, gradually pull in the flour-sugar mixture from the sides to form a thick paste. This step helps avoid lumps in the final batter.
Slowly pour the warm milk mixture into the bowl in 3–4 additions, whisking gently after each addition. The batter should become quite thin and smooth, similar to a crêpe batter. If you are using honey, whisk it in now until fully dissolved.
Stir in the dark rum until evenly incorporated. The batter will be fluid and may have a few small bubbles, which is fine.
Pass the batter through a fine-mesh strainer into a clean bowl or large jug, pressing gently on any small lumps. Discard the vanilla bean pod. Cover the bowl or jug tightly with plastic wrap or a lid.
Step 4: Rest the Batter (24–48 Hours)
Refrigerate the covered batter for at least 24 hours and up to 48 hours. This resting period is essential: it hydrates the flour, mellows the alcohol, and develops the custard’s flavor and texture, giving the canelés their distinctive creamy interior and evenly bubbled crumb.
Before baking, remove the batter from the refrigerator and give it a gentle stir to reincorporate any separation. Let it sit at room temperature for about 30 minutes so it is not ice-cold when it goes into the oven. Cold batter can lead to uneven baking.
Step 5: Preheat the Oven and Prepare the Molds with Beeswax
Place a large baking sheet on a rack in the lower third of your oven. Arrange the copper molds upside down on the baking sheet. Preheat the oven to 475°F (245°C). Allow the molds and baking sheet to heat thoroughly; this usually takes at least 20–25 minutes from a cold oven.
While the oven is heating, gently melt the beeswax and butter together. Place them in a small saucepan over very low heat, or in a heatproof bowl set over a pan of barely simmering water (double boiler style). Stir until completely melted and combined, then remove from heat. Do not overheat the beeswax; it should be just melted, not smoking.
Carefully remove the hot molds from the oven (use thick oven mitts). Turn them right side up on the hot baking sheet. Working one mold at a time, pour a small amount of the hot beeswax-butter mixture into a mold, swirl quickly to coat the inside in a very thin layer, then pour the excess wax mixture back into the pan or a heatproof bowl. Repeat with all molds. The coating should be as thin as possible; too much wax will make the crust thick and overly hard.
Once coated, allow the molds to stand for a few minutes at room temperature, or place them briefly in the refrigerator or freezer to set the wax-butter layer. The interior should look opaque and evenly coated.
Step 6: Fill the Molds and Bake Until Deeply Caramelized
Reduce the oven temperature setting back to 475°F (245°C) if it has dropped. Give the rested batter a gentle stir. Pour the batter into the prepared molds, leaving about 1/8 inch (3 mm) of space at the top; they should be almost full but not overflowing. If your molds are already on the hot baking sheet, pour carefully to avoid spills.
Place the baking sheet with the filled molds into the oven. Bake at 475°F (245°C) for 15 minutes. This high heat helps set the exterior and encourages the signature rise and hollowing.
Without opening the oven door too long, reduce the temperature to 400°F (200°C) and continue baking for an additional 55–60 minutes, depending on your oven and the exact size of your molds. The canelés are done when the tops and sides are a very dark mahogany brown, almost black in some spots, with a shiny, firm crust. Do not remove them when they are just golden; they should look much darker than most cakes. Underbaked canelés will lack the crisp shell and have a doughy interior.
Step 7: Unmold, Cool, and Serve
When the canelés are deeply colored and baked through, remove the baking sheet from the oven and let the molds cool on the sheet for about 10 minutes. They should still be warm and not completely cool when you unmold them; this helps them release cleanly and keeps the crust crisp.
Working one by one, gently tip each mold over a cooling rack. The canelé should slide out with a gentle shake; if one is stubborn, tap the base lightly or run a small knife around the top rim only (avoid scraping the sides). Allow the canelés to cool on the rack until just slightly warm or at room temperature.
Canelés are at their very best within a few hours of baking, when the crust is crisp and the interior is softly custardy, scented with vanilla and rum.
Pro Tips
- Do not skip the rest. The 24–48 hour rest dramatically improves flavor and gives the interior its characteristic silky, custard-like texture.
- Use very thin wax coating. Swirl quickly and drain thoroughly. Too much beeswax-butter makes the crust excessively thick and hard.
- Bake darker than you think. Truly authentic canelés are very dark brown, almost black at the edges. This deep caramelization is what makes the crust so flavorful.
- Oven variability. If your canelés are burning, reduce the lower temperature to 390°F (200°C) or shorten the second baking phase by 5–10 minutes. If they are too pale, extend baking by 5–10 minutes.
- Strain for a smooth crumb. Straining the batter removes lumps and bits of cooked egg or vanilla pod, leading to an even, custardy interior with fine bubbles.
Variations
- Spiced Canelés: Add a pinch of ground cinnamon and a small grate of fresh nutmeg to the flour mixture. Keep it subtle so you do not overwhelm the vanilla and rum.
- Citrus Twist: Add 1–2 tsp of finely grated orange or lemon zest to the warm milk (strain before chilling the batter). Pair with a lighter rum or even a splash of Grand Marnier.
- Without Beeswax: If you cannot find food-grade beeswax, you can simply butter the molds very generously. The crust will be slightly less glassy and crisp, but still delicious.
Storage & Make-Ahead
Batter: The batter can be prepared up to 48 hours in advance and kept covered in the refrigerator. This actually improves the final result, so it is perfect for making ahead.
Baked canelés: Canelés are best enjoyed within 6–8 hours of baking, when the crust is crisp and the interior is moist. After that, the crust gradually softens. Store completely cooled canelés in an airtight container at room temperature for up to 2 days.
If the crust softens, you can refresh them by placing the canelés on a baking sheet in a 400°F (200°C) oven for about 5–8 minutes. Let cool a few minutes before serving. They will not be exactly like freshly baked, but the exterior will regain some crispness.
Canelés do not freeze particularly well, as freezing tends to change the texture of the custard interior and soften the crust. If you must freeze them, wrap individually and freeze up to 1 month, then re-crisp in a hot oven before serving.
Nutrition (per serving)
Approximate values per canelé (1 of 12): about 200 calories, 8 g fat, 27 g carbohydrates, 5 g protein, 19 g sugar, 0.3 g fiber, 120 mg sodium. Values will vary based on exact ingredients, mold size, and coating thickness.