Quick Recipe Version (TL;DR)
Quick Ingredients
- 1 cup (240 g) fresh poi, room temp
- 3/4 cup (180 ml) unsweetened full-fat coconut milk
- 1 1/4 cups (175 g) mochiko (sweet rice flour), plus 2–4 tbsp (15–30 g) if needed
- 1/4 cup (50 g) granulated sugar
- 1 tsp baking powder
- 1/4 tsp kosher salt
- 1/3 cup (65 g) superfine or granulated sugar, for dusting
- 1–2 tsp li hing mui powder (optional), for dusting
- Neutral oil for frying (2–3 inches depth)
Do This
- 1. Stir 1/3 cup sugar with 1–2 tsp li hing powder; set aside for dusting.
- 2. Whisk mochiko, 1/4 cup sugar, baking powder, and salt.
- 3. Whisk poi, coconut milk, and vanilla (if using), then fold into dry to make a thick, sticky dough; add 2–4 tbsp mochiko if too loose.
- 4. Rest dough 10 minutes while heating oil to 350°F (175°C) in a heavy pot, 2–3 inches deep.
- 5. Scoop 1 tbsp portions; drop into oil. Fry 3–4 minutes, turning, until deep golden and crisp.
- 6. Drain briefly, then toss warm mochi in sugar or li hing sugar. Serve hot and crisp.
Why You’ll Love This Recipe
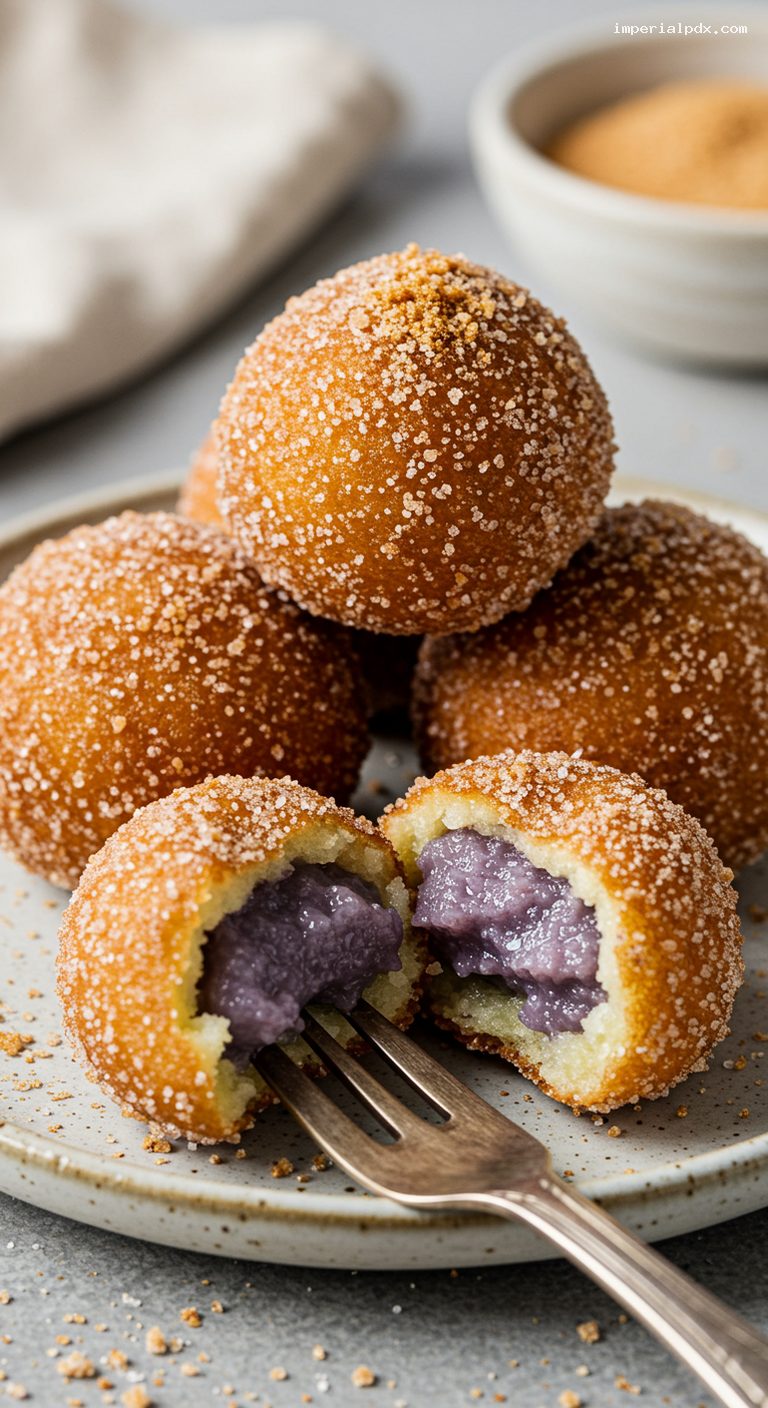
- Crispy edges with a chewy, mochi-soft center and a whisper of coconut.
- Classic island flavor from poi, with a zippy sweet-tart li hing finish.
- Simple, bowl-and-whisk batter you can fry in minutes.
- Party-friendly bites that stay tender as they cool.
Grocery List
- Produce: Fresh poi (or prepared poi from the refrigerated section)
- Dairy: None
- Pantry: Mochiko (sweet rice flour), unsweetened full-fat coconut milk (canned), granulated sugar, superfine sugar (optional), baking powder, kosher salt, li hing mui powder (optional), vanilla extract (optional), neutral frying oil (canola, peanut, or safflower)
Full Ingredients
Poi Mochi Dough
- 1 cup (240 g) fresh poi, room temperature
- 3/4 cup (180 ml) unsweetened full-fat coconut milk
- 1 1/4 cups (175 g) mochiko (sweet rice flour), plus 2–4 tbsp (15–30 g) more if needed for consistency
- 1/4 cup (50 g) granulated sugar
- 1 tsp baking powder
- 1/4 tsp kosher salt
- 1 tsp vanilla extract (optional)
For Frying
- Neutral oil (canola, peanut, or safflower), enough for 2–3 inches in a heavy pot (about 1.5–2 quarts / 1.4–1.9 liters)
For Dusting
- 1/3 cup (65 g) superfine sugar or granulated sugar
- 1–2 tsp li hing mui powder, to taste (optional; for a tangy-sweet dust)
Step-by-Step Instructions
Step 1: Mix the dusting sugar
In a shallow bowl, stir together 1/3 cup sugar and 1–2 teaspoons li hing mui powder until evenly pink-red. Taste and adjust li hing to your preferred tanginess. If you prefer classic sugar-only coating, set plain sugar in a separate bowl.
Step 2: Combine the dry ingredients
In a medium bowl, whisk the mochiko, 1/4 cup sugar, baking powder, and salt. Breaking up any lumps now helps the batter stay smooth and fry evenly.
Step 3: Whisk the wet and make the dough
In another bowl, whisk the poi, coconut milk, and vanilla. Pour wet into dry. Stir with a spatula until a thick, glossy, sticky dough forms—about the texture of soft ice cream. If your poi was very loose, add mochiko 1 tablespoon at a time (up to 2–4 tablespoons / 15–30 g) until the dough holds soft mounds.
Step 4: Rest the dough and heat the oil
Let the dough rest for 10 minutes to hydrate. Meanwhile, pour oil into a heavy pot to a 2–3 inch depth and heat to 350°F (175°C). Aim to fry between 340–350°F (171–177°C) for crisp outsides and chewy centers.
Step 5: Scoop and fry the first batch
Using a small cookie scoop or two spoons, drop 1-tablespoon portions of dough into the hot oil. Do not overcrowd; 5–6 pieces per batch is ideal. Fry 3–4 minutes, turning occasionally, until the mochi balls are deep golden with lightly blistered, crisp edges. Maintain oil temperature, allowing it to return to 350°F (175°C) between batches.
Step 6: Drain and coat
Transfer fried mochi to a wire rack or paper towels for 30–45 seconds to drain excess oil. While still warm, toss in the sugar or li hing sugar to coat evenly. Work in small batches so the sugar adheres well.
Step 7: Serve hot
Serve immediately while the shells are crisp and the centers are chewy. For a party platter, set out both plain sugar and li hing sugar bowls so guests can choose their finish.
Pro Tips
- Consistency is key: the dough should be thick and scoopable, not pourable. Adjust with up to 2–4 tablespoons mochiko if needed.
- Test one: fry a single mochi first to confirm browning time and chew. Adjust heat or dough thickness based on results.
- Control the heat: keep oil between 340–350°F (171–177°C). Too hot and the centers undercook; too cool and they absorb oil.
- Scoop smart: lightly oil your scoop or spoons for cleaner release and rounder mochi balls.
- Coat warm: sugar sticks best when the mochi are just drained but still hot.
Variations
- Cinnamon-Li Hing Sugar: Mix 1/3 cup sugar with 1 tsp li hing powder and 1/2 tsp ground cinnamon.
- Toasted Coconut Sugar: Pulse 1/3 cup sugar with 2 tbsp toasted shredded coconut; coat warm mochi for extra aroma and crunch.
- Black Sesame: Add 1 tbsp toasted black sesame seeds to the dough and coat finished mochi in plain sugar.
Storage & Make-Ahead
Best enjoyed fresh. To hold short-term, keep fried mochi on a wire rack in a 200°F (95°C) oven for up to 45 minutes. Store leftovers uncovered at room temperature for up to 6 hours, or refrigerate in a paper towel–lined container up to 2 days. Recrisp at 325°F (165°C) for 8–10 minutes, then re-dust with sugar. Freeze cooked, undusted mochi in a single layer, then bag for up to 1 month; reheat from frozen at 325°F (165°C) for 12–14 minutes and dust while warm. The raw dough is too sticky to freeze reliably.
Nutrition (per serving)
Approximate for 3 mochi balls: 260 calories; 8 g fat; 44 g carbohydrates; 11 g sugar; 2 g protein; 135 mg sodium. Values will vary with oil absorption and dusting choice.